|
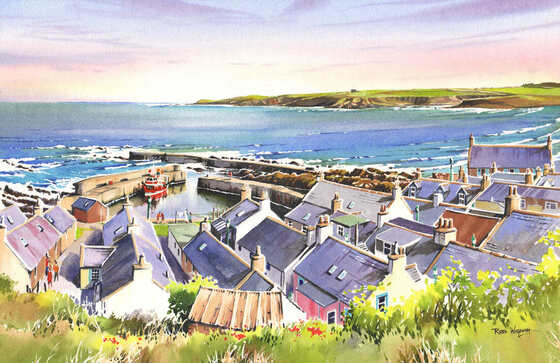
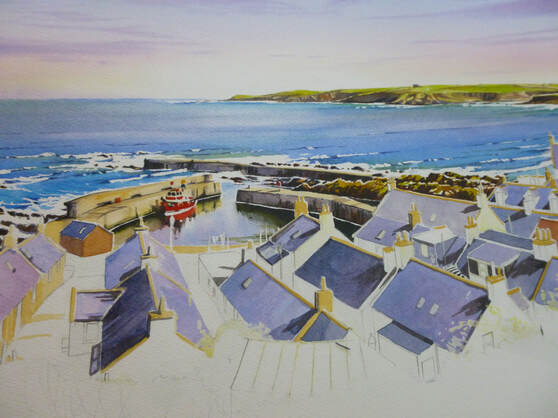
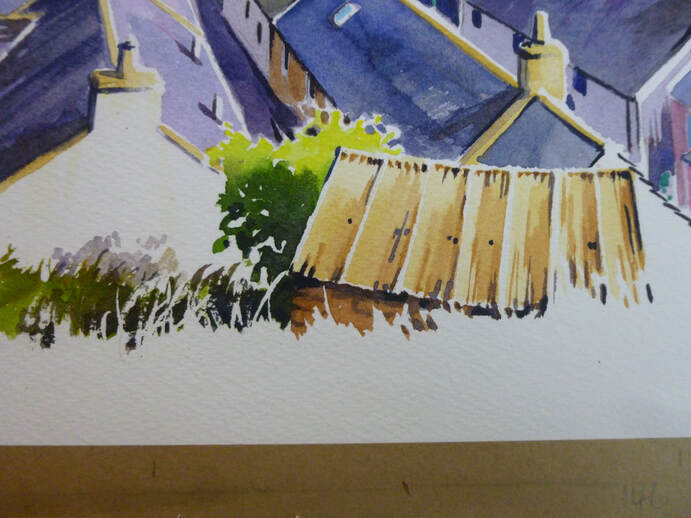
If you've read the first two episodes of this little mini-series, I hope you're ready to finish the painting! Without further ado, let's get on with it! Here's where we want to be: And here's where we got to last time, with the roofs of the houses painted (bear in mind that the photos of the work in progress are just quick snaps on my board): What I didn't mention last time was the chimneys and the roof apexes which have been painted in in their colours. As mentioned previously, for sunlit stonework I tend to use an underpainting of yellow ochre and here it's been overpainted with either raw sienna for yellow claywork or light red for redder versions. The yellow ochre amd the white highlights help to give a sunlit effect throughout. I also keep the colours bright. Chimneys are often stained a dark colour in real life but it's not usually very pretty so I'm happy to keep the colours bright in my painting! I now have to confess that I didn't take as many photos of the last stages as I would have liked, so please bear with me through the words, which I'll keep as brief as I can. The next stage is to paint in the shadows throughout the painting. Why do them first? It's because the application of shadows over already painted passages will blur the detail and cause colours to run, which I don't want. By applying the shadows first, and painting colours over the top with a light touch so as not to disturb the paint, this can be reduced - so I put the shadows in first. It does take a little practice to work out how strong to make the shadow washes, especially as they fade a bit as they dry. It helps to make a strong wash - strong enough to be almost black for the densest shadows and then scoop some of it out to make a series of about 3 progressively weaker washes. These will then be the same colour - so will sit well together - but help you differentiate between lighter and darker shadows. My usual shadow mix is the sky blue (normally ultramarine), the sky red, (normally rose madder) to make a bluey-purple, greyed with a little burnt sienna. The sienna is powerful in this mix, so I find it better to mix the purple then add brown a bit at a time until the right degree of grey is obtained. How much you grey it is up to you. I prefer to keep my shadows purple-tinged for colour effect but if you add a bit more burnt sienna you can make a flat grey - it's personal preference! I apply the shadow colours with a round brush in a 'drawing with the brush' style. I bear in mind that the stronger the sunlight, the darker the shadows. But equally, I also remember that shadows still have some light. For example, the left hand walls of the houses here will be quite dark with the sun coming from the right - unless they stand opposite a white wall from the house opposite, which will illuminate the shadow area with reflected light. It all makes sense if you think about it - and as usual close observation of the subject is the key! Having done the shadows, it is a simple matter to go around and lay colours for the houses and streets over them. I also add windows, drainpipes etc at this stage. Before commencing either of these stages, I applied masking fluid to protect any foreground objects like trees and leaves so, once the shadows, colours and details have been applied to the houses, I remove that. We've now got to this stage: Only really the vegetation in the foreground to do! I hope that you will see that the level of detail I have applied in the stages so far is not very great. It's a mistake to think that detail is everything, I think. Rather, a few carefully placed squiggles do a better job of suggesting the detail the viewer's brain thinks is there. Moving on to the greenery in the foreground, you see here a favourite 'trick' of mine, which is to split it into sections and use masking fluid to suggest blades of grass or leaves in the nearer vegetation. With the masking fluid in place, I add the furthest greens, adding shadow mix as I get lower. This darkness makes a great contrast with the lighter grass leaves I will paint later and suggest a mass of leaves at the same time! To give a 3-D effect to the green colours, I'd suggest you need at least 3 tones. So, for trees, I mix 3 washes: a light yellow wash, usually with lemon yellow featuring strongly. The mid-green will be either sap green knocked back with raw sienna or another combination such as Payne's Grey with Transparent Yellow. Finally, I mix a dark green by adding either shadow colour or more Payne's grey. I start by laying in a blob of the lightest wash on the sunlit side, mixing it wet in wet with the middle green for the 'middle' of the tree, and then adding dark once the tree is on its way to drying (to stop the dark spreading too far). By leaving those white 'sparkles' of light on the sunny side we can create the effect of vegetation glimmering in the light, with warm, dense shadows. Finally, the foreground grassy area is painted. Because this is foreground, I want warm colours (red-biased) so mix warm and dense green washes, adding a little sky red and light red to the mixes. I mask a few dots for flowers (even if they're not there in the real world - life's too short to have no flowers!) and then apply the foreground wet-in-wet. I don't want too much detail in the foreground, just a suggestion of detail and warm flowing colours that suggest that the vegetation is close to us. By suppressing detail we force the viewer's eye elsewhere and apply a metaphorical 'nothing to see here' label - so their eye goes up to the main picture, where we want it! In particular, you will see that I give almost no detail on the bottom few centimetres. Once this wet-in-wet wash is dry, I go back with a few dark hints to suggest shadows between leaves and blades of grass. Here 'less is more' is the secret, as too much of it will darken the foreground and give it too much emphasis, as well as spoiling the effect. And that's it! We're done! At this stage I normally go and leave the painting overnight without any further thought. A glass of wine helps here (notice a theme here!?!). The next day I come back with a fresh eye. Mostly I now just tidy up detail and add some more contrast where needed - stronger darks, lighter lights and sometimes a blob of permanent white gouache if necessary. But then I leave it. Too much fiddling spoils the 'immediacy' and spontaneity of the painting, so it's best left as it is. And here's the final result in better lighting conditions: 'Sandend Harbour from the Brae', watercolour, 54 x 35 cm. The original and prints are available to buy - see www.robwighamwatercolours.com/available-work.html for details! I hope you have enjoyed this little series and have found it helpful. All the best, Rob.
2 Comments
Barbara
3/3/2020 09:06:49 pm
that is just so nice Rob, great really, thank you, I love it.
Reply
1/6/2020 02:48:39 pm
Wow! Your works are amazing! I have been following your mini series ever since I discovered your blog. I just want you to know that I am a great fan of your works and I really admired your talent. Just keep going and do it with your love. I know the feeling of being able to, do you really love and trust me, it’s the best feeling in the world. I hope you never got tired of sharing your works with us.
Reply
Leave a Reply. |
AuthorA professional artist living and working in the beautiful north of Scotland. My work is realistic and quite traditional, though strongly interpretational in nature. My inspiration is the beauty of Nature, and the wonderful colours and moods she shows everywhere. Archives
April 2022
Categories |


 RSS Feed